Friday, January 21, 2011

jQuery Input Button Plugin - Iconizes Submit and Reset Buttons

Demo | Source

Last week I wrote a post on jQuery UI Buttons using Custom Icons. As I was testing the functionality, I felt that the jQuery UI Button widget was missing something - the ability to add icons to Submit and Reset buttons. So, I rolled my own plugin.

This plugin enables adding icons to Submit and Result buttons. Behind the scenes, the plugin replaces the Submit and Reset buttons with standard button elements and then delegates the rest to the jQuery UI Button widget.

This plugin can be used just like the jQuery UI Button widget, the only difference is the function that is invoked on the selector.

To use the plugin, you need to reference all the required jQuery UI Button widget resources and add a reference to the jquery.inputButton.js script file (available in the source download).  Then you would replace the jQuery UI Button widget function attached to your selector with the inputButton function.  That's quite a mouthfull, so here's a snippet.

$(function(){   
    // this will not add icons to your buttons - it will only stylize the buttons         
    $("input:submit:first").button({ icons: { primary: "ui-icon-disk"} });
    $("input:reset:first").button({ icons: { primary: "ui-icon-refresh"} });

    // this will add icons and stylize your submit and reset buttons
    $("input:submit:first").inputButton({ icons: { primary: "ui-icon-disk"} });
    $("input:reset:first").inputButton({ icons: { primary: "ui-icon-refresh"} });
});

Other than that, the plugin is identical to that of the jQuery UI Button widget.

A few things to keep in mind:
  • This is a proof of concept. I've tested with Chrome, Firefox, and IE 8 and it works as intended and designed.
  • Once the inputButton plugin is executed, the Submit and Reset buttons are now Button elements; therefore, all code that manipulates elements filtered on the button element (e.g. $("button")) will include the transformed Submit and Reset buttons.
  • If neither a Submit nor a Reset button is passed as the selector, the selector is passed along to the jQuery UI Button widget - meaning the selector is handled just like any other selector by the jQuery UI Button widget.

Okay, that's about it. Thanks for reading..

Demo | Source

Friday, January 14, 2011

jQuery UI Buttons using Custom Icons

Demo | Source

Everything jQuery rocks!

jQuery makes JavaScript development enjoyable.  jQuery UI gives us common functional components that are easy to configure and even easier to plug into our applications.  jQuery UI Themes gives us the ability to stylize our applications using easy to learn conventions; furthermore, jQuery UI trivializes theme switching.

So why do we need to customized our jQuery button icons?  The truth is is that we probably don't; however, I tend to find myself wanting more when it comes to out-of-the-box jQuery icons.

Awhile back, I created a project on CodePlex for ASP.NET Web Forms called Iconized Control Set.  You can read about it here, download the bits here, and demo it here.  The following is the description from CodePlex: "ASP.NET WebForms IconizedButton Custom Control Set. Replaces the dull Button/LinkButton/HyperLink controls with styling and left and right aligned icons (via FamFamFam icon set). Contains built-in control styles/skins. Available customized user-configured styles/skins via CSS."

I wanted something similar to my Iconized Control Set, yet I wanted to use it for raw HTML and possibly for ASP.NET MVC.  While I plan on creating an MVC HTML Helper to abstract the details, I'm not quite ready to go down that road; however, the code here will help me create the MVC HTML Helper in due time.

While I consider this a proof-of-concept, I've tested the output in FireFox, Chrome, and IE 8 and it appears to working just fine.

In building the custom icon functionality for the jQuery Button, I once again relied on the excellent FamFamFam icon set.  The FamFamFam icon set is not a requirement to use this customization implementation; however, I find that the FamFamFam icon set gives me what I need and then some.  That said, you can certainly create your own classes and use any icons that you desire.

Okay, enough background and introduction stuff....  On to the demo...

Take a look at the demo here.

Beyond the standard jQuery imports and configuration, you will need the resources located in the code download here.  Once you have you jQuery import and configuration set up, you will need to add the following two CSS imports to your page:

<link type="text/css" href="assets/css/fff.icon.core.css" rel="stylesheet"/>
<link type="text/css" href="assets/css/fff.icon.icons.css" rel="stylesheet"/>

Once you have that, all you need to do is pass your custom icon class to the button widget function in the standard jQuery button widget implementation:

$(function(){            
    $(".nav a").button({icons: {primary: "fff-icon-house-go"}});                  
});

Note.  The demo and download both have all the custom CSS classes in one file.  While this makes a demo like this easy, this file is big and is not recommended in production.  Extract the icon classes that your application uses and put those classes into one of your application stylesheets.

Okay, that's about it. Thanks for reading...

Saturday, January 8, 2011

Themed & Ajaxified MVCContrib Grid - with page size dropdown

Demo | Source

MVCContrib Grid.

Okay, that's a little biased; however, within a couple of hours of toying around with the MVCContrib Grid, I was sold.  I won't go into all the functionality provided by the grid - you can read about it here, read a more detailed writeup on Jeremy Skinner's blog here, and there's a nice writeup on the use of the grid here. What I really like about the MVCContrib Grid is the fluent code design and GridModels.  These two items are reviewed  on the MVCContrib Grid page and Jeremy's posts.

I'm kind of a demanding guy that is rarely satisfied.  And while the MVCContrib Grid is sweet, I still wanted more.  What are my demands?  I use 'demands' lightly, but many people I know would disagree... I digress.  Here they are:
  • Themeable via jQuery UI Themes
  • AJAX enabled
  • Page Size enabled,
  • Easy to use, and
  • Easy to apply to an existing MVCContrib Grid implementation.
The AJAX purests out there will disagree with my implementation of the AJAX functionality.  I call my implementation 'poor man's AJAX.'  I make the request and pass back markup.  Why?  Referring back to my list of 'demands'... the last two bullets are very important.  I don't want fellow developers to have to learn something new - Microsoft .NET related technologies are moving at a rapid pace - there's already enough to learn - I'm writing this post on a Saturday - go away... ;-)  I want the developers to make maybe a handful of simple changes to existing code and bam - it's done.

My implementation includes three parts:
  1. C# Class Library.  A class that overrides the HtmlTableGridRenderer (HtmlTableGridThemedRenderer), a class that defines a new Pager called PagerThemed, and a couple new HTML Helper extensions.
  2. A jQuery Plugin - mvccontribGrid.  This plugin handles the AJAX requests and some grid stylization. This plugin works like any jQuery plugin.  You pass a selector and a few options and the grid's good-to-go.
  3. CSS.  Simple CSS classes that provide the grid-specific styles.
In order to use the grid, you will also need jQuery and a jQuery Theme.

A little word on design.  I originally put all the CSS classes and selectors markup in the C# code; however, those markup features started to weigh down the AJAX response, so I moved CSS classes and selector additions to the plugin.  The HtmlTableGridThemedRenderer has a method called LighenUp.  This method sets an internal field that will either reduce (or not) the aforementioned CSS classes and selectors on the server-side.  The default it true - meaning the CSS classes and selectors will be rendered via the jQuery plugin - client-side.

The only part of my implementation that 'smells' a bit it the requirement to have a View and a PartialView that serve almost the same function.  Why does it smell?  It violates DRY.  However, I couldn't figure out another way to make it work without redesigning the grid control - that was not an option - I've got client work to attend to folks... :-)

Mentioning DRY, rather than cut and paste from the client (the MVC app) implementation and put it in this post, you can download the whole source code (with demo code) here.  The demo code is easy to follow.  Plus, I don't expend anyone to even read this post unless they have some developer knowledge and can easily figure out the simple logic.  Note that the source code includes a bunch of GAC assemblies copied as local references.  Since I designed the code using and for Razor (MVC 3), the GAC assemblies copied as local references was required for me to push the demo to my host - original development was MVC 3 RC2.  You can simply remove the local assemblies and replace with you GAC assemblies.

Oh yeah, almost forgot - take a look at the demo here and play around with it.  Notice that the demo include the jQuery themeroller, so you can place around with the various themes available from jQuery UI.

Thanks for reading...

References:

Demo | Source

Wednesday, December 29, 2010

ASP.NET MVC 3 Custom Validation

Data annotations Rock!  Using data annotations on your model classes make data validation (client and server) trivial.  Just add the data annotation to you model class, wire up an edit/create view to your controller via the 'Add View' wizard, and you have client- and server-side validation with very little effort.

A little disclaimer here - the implementation below it not MVC 3 specific; however, I developed the solution using MVC 3, tested using MVC 3, and it works using MVC 3.  I'm pretty sure it will work as-is using MVC 2.

What if you need validation that is not provided via data annotations out-of-box?  You create your own.  That's what this post is all about.

Creating your own validators that support client- and server-side validation is essentially a four-step process:
  1. Create a custom attribute that extends the ValidationAttribute, or better yet, you extend one of the existing data annotations.
  2. Create a custom validator that extends the DataAnnotationsModelValidator, where T is the type of custom attribute you created in step one.
  3. Create a client-side script to handle the client-side validation.
  4. Register the attribute/validator classes in your app's bootstrapper or Global.asax.
Side note: It seems that every time I have a good idea for a post, Phil Haack has beat me to the punch... and this pattern is also true in this scenario :-) For a similar article on the same subject, please see Phil's ASP.NET MVC 2 Custom Validation post.

This post is very code centric; therefore, if the concepts are unfamiliar or a brushing up is necessary, please take a look at Phil's post.  Also, Brad Wilson has a few different blog posts/series on Data Annotations and ModelMetadata.  Brad and Phil's knowledge of the ins and outs of anything ASP.NET MVC (and arguably C#) scares me...

The custom attribute and validator that I'm going to create is an Email validator.  There are plenty examples on the net, including here, here, etc...  What these email validator solutions don't provide is client-side validation.  I will show you how.  So, lets start with step one:

1. Create a Custom Attribute
Below are two solutions.  They both result in the same functionality.  The first solution is a full implementation that extends the ValidationAttribute class, while the second solution extends the RegularExpressionAttribute.

EmailAttribute Extending Validation Attribute
using System;
using System.ComponentModel.DataAnnotations;
using System.Globalization;
using System.Text.RegularExpressions;

namespace Validation
{
    /// <summary>
    /// Email Attribute class used for email validation. Used similar to the System.ComponentModel.DataAnnotations.RegularExpressionAttribute.
    /// </summary>
    public class EmailAttribute : ValidationAttribute
    {
        #region Properties

        /// <summary>
        /// Gets or sets the Regular expression.
        /// </summary>
        /// <value>The regex.</value>
        private Regex Regex { get; set; }

        /// <summary>
        /// Gets the pattern used for email validation.
        /// </summary>
        /// <value>The pattern used for email validation.</value>
        /// <remarks>
        /// Regular Expression Source - Comparing E-mail Address Validating Regular Expressions
        /// <see cref="http://fightingforalostcause.net/misc/2006/compare-email-regex.php"/>
        /// </remarks>
        public string Pattern
        {
            get
            {
                return
                    @"^([\w\!\#$\%\&\'\*\+\-\/\=\?\^\`{\|\}\~]+\.)*[\w\!\#$\%\&\'\*\+\-\/\=\?\^\`{\|\}\~]+@((((([a-zA-Z0-9]{1}[a-zA-Z0-9\-]{0,62}[a-zA-Z0-9]{1})|[a-zA-Z])\.)+[a-zA-Z]{2,6})|(\d{1,3}\.){3}\d{1,3}(\:\d{1,5})?)$";
            }
        }

        #endregion Properties

        #region Ctors

        /// <summary>
        /// Initializes a new instance of the <see cref="EmailAttribute"/> class.
        /// </summary>
        public EmailAttribute()
        {
            this.Regex = new Regex(this.Pattern);
        }

        #endregion Ctors

        /// <summary>
        /// Determines whether the specified value of the object is valid.
        /// </summary>
        /// <param name="value">The value of the object to validate.</param>
        /// <returns>
        /// true if the specified value is valid; otherwise, false.
        /// </returns>
        public override bool IsValid(object value)
        {
            // convert the value to a string
            var stringValue = Convert.ToString(value, CultureInfo.CurrentCulture);

            // automatically pass if value is null or empty. RequiredAttribute should be used to assert an empty value.
            if (string.IsNullOrWhiteSpace(stringValue)) return true;

            var m = Regex.Match(stringValue);

            // looking for an exact match, not just a search hit.
            return (m.Success && (m.Index == 0) && (m.Length == stringValue.Length));
        }
    }
}

EmailAttribute Extending RegularExpressionAttribute
using System.ComponentModel.DataAnnotations;

namespace Validation
{
    /// <summary>
    /// Email Attribute class used for email validation. Used similar to the System.ComponentModel.DataAnnotations.RegularExpressionAttribute.
    /// </summary>
    public class EmailAttribute : RegularExpressionAttribute
    {
        #region Ctors

        /// <summary>
        /// Initializes a new instance of the <see cref="EmailAttribute"/> class.
        /// </summary>
        public EmailAttribute()
            : base(
                @"^([\w\!\#$\%\&\'\*\+\-\/\=\?\^\`{\|\}\~]+\.)*[\w\!\#$\%\&\'\*\+\-\/\=\?\^\`{\|\}\~]+@((((([a-zA-Z0-9]{1}[a-zA-Z0-9\-]{0,62}[a-zA-Z0-9]{1})|[a-zA-Z])\.)+[a-zA-Z]{2,6})|(\d{1,3}\.){3}\d{1,3}(\:\d{1,5})?)$"
                )
        {
        }

        #endregion Ctors
    }
}
ddd
Again, whatever implementation you choose is up to you.  Both implementations have the same resulting functionality - Email validation via data annotations.

2. Create a custom validator that extends the DataAnnotationsModelValidator
This class - the validator class - is the class that provides metadata to enable client-side validation.  This class essentially transfers settings, in our case the ErrorMessage and Pattern properties of the EmailAttribute class, from the attribute decorations on your model object to the client-side consumer.  The client-side consumer is what provides the client-side validation.

using System.Collections.Generic;
using System.Web.Mvc;
using Chinook.Framework.Validation;

namespace Chinook.Web.Core.Validation
{
    /// <summary>
    /// Provides a model validator for the EmailAttribute annotation.
    /// </summary>
    public class EmailValidator : DataAnnotationsModelValidator<EmailAttribute>
    {
        #region Fields

        private readonly string _errorMessage;
        private readonly string _pattern;

        #endregion Fields

        #region Ctors

        /// <summary>
        /// Initializes a new instance of the <see cref="EmailValidator"/> class.
        /// </summary>
        /// <param name="metadata">The metadata.</param>
        /// <param name="context">The context.</param>
        /// <param name="attribute">The attribute.</param>
        public EmailValidator(ModelMetadata metadata, ControllerContext context, EmailAttribute attribute)
            : base(metadata, context, attribute)
        {
            this._errorMessage = attribute.ErrorMessage;
            this._pattern = attribute.Pattern;
        }

        #endregion Ctors

        #region Methods

        /// <summary>
        /// Retrieves a collection of client validation rules.
        /// </summary>
        /// <returns>A collection of client validation rules.</returns>
        public override IEnumerable<ModelClientValidationRule> GetClientValidationRules()
        {
            var rule = new ModelClientValidationRegexRule(this._errorMessage, this._pattern);
            return new[] {rule};
        }

        #endregion Methods
    }
}
So now that we have the attribute and validator classes created, we need to...

3. Create a client-side script to handle the client-side validation
I feel like I'm cheating on you here.  Out scenario - email validation - and it's implementation do not require us to write client-side script.  I know, I know... if you feel robbed, you can create your own client-side script, and register is with the jQuery Validate plugin.  I'll try and create a future post will another validator that requires writing client-side script and jQuery Validate registration, but for now we going to enjoy the luxuries of extending and using existing functionality.  But, HOW do we get away with using existing client-side script?

Take a look at the following code snippet from step two:
public override IEnumerable<ModelClientValidationRule> GetClientValidationRules()
{
    var rule = new ModelClientValidationRegexRule(this._errorMessage, this._pattern);
    return new[] {rule};
}

This method 'retrieves' a collection of client validation rules.'  And since we are essentially using a RegularExpressionAttribute class (via extension), we can use the client validation rules used by the RegularExpressionAttribute's Model Validator class via the ModelClientValidationRegexRule passing our Error Message and Regular Expression pattern.

This bring us to our last step...

4. Register the attribute/validator classes in your app's bootstrapper or Global.asax
To make all this sweetness happen, we need to register the attribute and validator classes when the app domain kicks off its like cycle.  In your Global.asax's Application_Start method, register the attribue and validator classes using the following code snippet:
// register custom model validators
DataAnnotationsModelValidatorProvider.RegisterAdapter(typeof(EmailAttribute), typeof(EmailValidator));
To use the attribute and validator classes use just created, you need to decorate you model/POCO classes with data annotations, including your EmailAttribute class.  The following shows how the EmailAttribute is used (along with other data annotations) to decorated a property in your model class:
[Display(Name = "Email")]
[Required(ErrorMessage = "Email is Required.")]
[Email(ErrorMessage = "Not a valid Email Address.")]
[StringLength(60, ErrorMessage = "Email must be under 60 characters.")] 
public string Email { get; set; }

Once you create strongly typed Edit and/or Create Views using your models, include the script libraries, and run the application, you will see the fruits of your labor and get client-side validation.  The screenshot below is an example.

Anyway, I hope you got a little something out of this post.

Thanks for reading...

Thursday, December 16, 2010

SQL Server - Get Table Dependencies via INFORMATION_SCHEMA - Template for SSMS

The following is a SQL Server script used to get a table's dependencies. The script uses SSMS template syntax, so you can add it to the SSMS Template Explorer and use the (Ctrl-Shift-M) keyboard sequence to set the script's parameters. The script returns the following for each dependency:
  • Parent Table Schema Name
  • Parent Table Name
  • Parent Table Primary Key Field Name
  • Foreign Table Schema Name
  • Foreign Table Name
  • Foreign Table Foreign Key Field Name
  • Foreign Table Foreign Key Constraint Name
What's nice is that the script uses INFORMATION_SCHEMA, so it may be used with other databases that support INFORMATION_SCHEMA; however, I have not tested the script with other databases. If you give the script a run on another database, I'd love to here about your experience.
-- ======================================================================
-- Template used to determine a specific table's dependencies.
--
-- Use the Specify Values for Template Parameters command (Ctrl-Shift-M) 
-- to fill in the parameter values below.
-- @schema_name:  the schema name of the table to retrieve dependencies
-- @table_name:  the table name of the table to retrieve dependencies
-- ======================================================================

DECLARE @SchemaName VARCHAR(128), @TableName VARCHAR(128);
SELECT @SchemaName = N'<schema_name, VARCHAR(128), dbo>', @TableName = N'<table_name, VARCHAR(128),>'

SELECT DISTINCT  
       pt.TABLE_SCHEMA AS ParentSchema, 
       pt.TABLE_NAME AS ParentTable, 
       pt.COLUMN_NAME AS ParentPrimaryField, 
       fk.TABLE_SCHEMA AS ForeignSchema, 
       fk.TABLE_NAME AS ForeignTable, 
       cu.COLUMN_NAME AS ForeignKeyField, 
       c.CONSTRAINT_NAME AS ForeignKeyConstraint 
FROM   INFORMATION_SCHEMA.REFERENTIAL_CONSTRAINTS c 
       INNER JOIN INFORMATION_SCHEMA.TABLE_CONSTRAINTS fk 
            ON  c.CONSTRAINT_NAME = fk.CONSTRAINT_NAME 
       INNER JOIN INFORMATION_SCHEMA.TABLE_CONSTRAINTS pk 
            ON  c.UNIQUE_CONSTRAINT_NAME = PK.CONSTRAINT_NAME 
       INNER JOIN INFORMATION_SCHEMA.KEY_COLUMN_USAGE cu 
            ON  c.CONSTRAINT_NAME = CU.CONSTRAINT_NAME 
       INNER JOIN ( 
                SELECT tc.TABLE_SCHEMA, 
                       tc.TABLE_NAME, 
                       kcu.COLUMN_NAME 
                FROM   INFORMATION_SCHEMA.TABLE_CONSTRAINTS tc 
                       INNER JOIN INFORMATION_SCHEMA.KEY_COLUMN_USAGE kcu 
                            ON  tc.CONSTRAINT_NAME = kcu.CONSTRAINT_NAME 
                WHERE  (tc.CONSTRAINT_TYPE = 'PRIMARY KEY') 
            ) pt 
            ON  pt.TABLE_NAME = pk.TABLE_NAME 
WHERE  (pk.TABLE_NAME = @TableName) 
       AND (pk.TABLE_SCHEMA = @SchemaName) 
ORDER BY 
       ForeignTable ASC; 
Thanks for reading...

Friday, September 10, 2010

jQuery Theme Switcher Reset Plugin

User Experience!  That's what bring 'um back.  Remember the first time you saw AJAX in action?  Maybe it was via your GMail or Hotmail account.  Whatever it was, you kept coming back to it.  Why?  Because it was cool; maybe because it was something that you've never seen before; or, maybe it was your fascination with 'How'd they do that?'  Bottom Line: User Experience!

Okay, I'll admit it - I'm not a designer!  I try, and I typically come up with some good solutions; however, it takes quite awhile.  Looking back at all the time I've spent making the UI look pretty, I could have added all that 'cool' functionality that the client wanted.

Finding patterns that are tried and trued, well known, relatively easy to implement, predicable, and reusable is a developers dream.  Unlike software development, I don't believe (well, I don't know...) that there a set of pervasive UI design patterns that all designers could pull out of their toolbox and share with other designers.  I'll spare you the details, but when a developer chats with another developer common design patterns are used to communicate the intent, architecture, design, and implementation of a software component - Singleton, Repository, Decorator, etc...

So, where am I going with this...?  User Experience!

Back to the 'cool' factor of AJAX, what else might bring back a user?  What's that?  A nice decision?  Easy to use interface?  Maybe, a UI customization feature where the user can select the way the UI is styled?  That's where I'm going with this...

Windows has (as far back as Windows 95 - probably farther) a function for a user to select various themes and background to change their Windows experience.  iGoogle, Windows Live, and Yahoo all have theming support.  Visual Studio even has theme support.

jQuery UI ThemeRoller is nothing new.  ThemeRoller gives you the ability to create common component themes, download the themes, and easily integrate the themes with you application/Web site.  Again, this is nothing new.  There is also a pluging for Firefox.  A sister jQuery project is the Theme Switcher widget.  The ThemeSwitcher widget gives the developer the opportunity to integrate theme switching functionality into their Web site to enhance the Use Experience - there's that phrase again...  The Theme Switcher is not as well known as the ThemeRoller, but it's nothing new either.

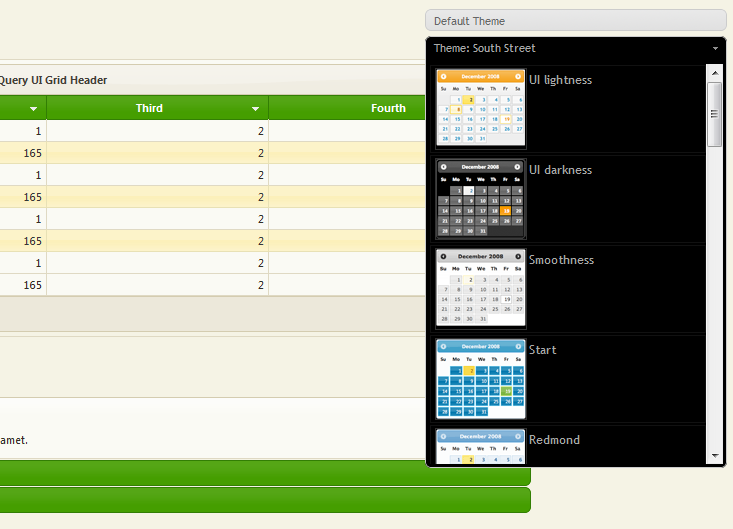
What the Theme Switcher lacks is a way to integrated a custom theme that you designed and downloaded from the ThemeRoller tool.  I've created a simple jQuery Theme Switcher proxy plugin that will integrate the Theme Switcher and all the outstanding jQuery UI themes with your default theme.

Rather than bore you with the implementation details, you can view a demonstration here: Theme Switcher Reset Proxy  Here's a screenshot:

You can download the code via View Source.
Thanks for reading...

Thursday, September 2, 2010

jQuery UI Frame Dialog - Loading Pane

An updated posted is located here.  This includes modifications to the plugin to avoid multiple iFrame source loads.

I like to use dialogs.  Specifically, I like to use inline dialogs rendered within the current window.  A popular implementation is the jQuery UI Dialog Widget.  I also like to render full page content in dialogs via iFrame object; however, jQuery UI Dialog Widget does not provide this functionality out-of-the-box.

There is a plethora of home grown solutions for rendering iFrames wrapped within the jQuery UI Dialog Widget; however, none really fit well with what I wanted to do.  That is, until I found the jQuery UI Frame Dialog Plugin.  The jQuery UI Frame Dialog Plugin provides extensions to the jQuery UI Dialog Widget for rendering iFrame content.  The implementation is as simple as it gets, and IMHO is the best solution for rendering iFrame content wrapped by the jQuery UI Dialog Widget.

The only this missing in the jQuery UI Frame Dialog Plugin was a way to provide a loading panel (eye candy) while the iFrame's source is loading.  You know the type - where an animated image is displayed while the content is acquired, loaded, and rendered and the animated image disappears when the the content is ready.

I made a few modification to the jQuery UI Frame Dialog Plugin to support the loading panel concept.  Essentially, I added a new property (loadingClass) to the options hash parameter.  The loadingClass property is a CSS class containing styles to apply to the jQuery Dialog Widget while the iFrame's content is being acquired, loaded, and rendered.  The following is an example of a CSS class used for the loadingClass parameter:
.loading-image { background: transparent url('assets/im/progress-indicator-alpha.gif') no-repeat center center; }
The following is the JavaScript used to open the dialog (initiated via an anchor):
$('#dialog_link').click(function(){
var $dialog =
   jQuery.FrameDialog.create({
      url: 'http://espn.go.com',
      loadingClass: 'loading-image',
      title: 'This is the Dialog\'s Title',
      width: 900,
      height: 600,
      autoOpen: false
   });
   $dialog.dialog('open');
   return false;
});
If you're interested, an online demo is located here: jQuery UI Frame Dialog Plugin with Loading Panel. The JavaScript file is accessible via View Source.

I wanted to notify the developer of my addition to the jQuery UI Frame Dialog Plugin.  So, I navigated to the plugin page, clicked the 'View Pending Feature Requests', successfully logged in with my account, and received the following error.  The crazy thing about this error, I keep getting this error if I navigate anywhere on the Plugins site while logged in.  Strange behavior!  Hopefully this is a temporary issue...


Thanks for reading...